Catching up...

Hello there...remember me?...it feels like it's been ages!

Before I say anything else, I want to thank all of you who sent me such warm wishes for health and recovery.  Your sweet thoughts worked and I am feeling better!  Now it's time for catching up!  As most of you know all too well, moms are not really supposed to get sick...especially at such a busy time of year.  Ah well...thankfully that little bump in the road is behind us and now it's time for the holiday break!  I love this time and am so looking forward to lots of good family time.  I find myself thinking of you even more than usual these past few days—as I rush about or cook or sit and stitch...I feel you out there doing the same and it's such a joy to know that I'm in such good company.  Strange this blogging thing...so lovely to feel so connected to people you've never met face to face...somehow it feels like we have...mind boggling.

Anyway, in the midst of last week's time-out I did manage to get a few things done.  Here are the spoils of my war with strep...

The pattern for 

Peggotty's Ruffle Mitts

.

Who is Peggotty and why does she need a pair of ruffle mitts?...to answer that question we are going to take a short trip on my knitting train of thought...

Here we go...

I need a pair of pretty but practical gloves...{I begin knitting the idea in my head}...ooh ruffles...

pretty...they look almost Victorian, in a good way...yes, a very good way...

...Victorian, hmmm...Dickens...

...David Copperfield

...Peggotty...

...oh yes, I will name them for Peggotty!..

yes, Peggotty, for sure...

...these mitts are warm, soft, and they make me feel special every time I wear them, just like Peggotty.

See the meandering path my knitting brain takes!  Do you know Peggotty?... David Copperfield's kindly nursemaid, a wonderful character, full of love and generosity.

I think it's kind of fitting that I came up with the name for these while I was sick...you know, all of those bed-ridden Dickensian characters and all.

What you really need to know about these mitts...

This is a simple pattern and one that really fits into the category of quicksy knitting.  Two evenings and voila—toasty, cute gloves!  I really love these gloves...in fact they are so nice that I made them twice {almost unheard of for me}.  The red pair is a year old and has been well-worn, although you can't tell that from looking at them.  I am not easy on my clothes—socks and gloves in particular—and these have really stood up to everything that I've thrown at them—love that!  The blue pair was made this week to test the pattern and to keep my daughter's hands out of my red pair.  And now I offer them to you!  

{Note:  This is a pattern that I made for my personal use and has not been to the tech editor.  If you would like to test knit this pattern, I would appreciate any feedback.

}

And here you can see the other thing that I did while I was convalescing...

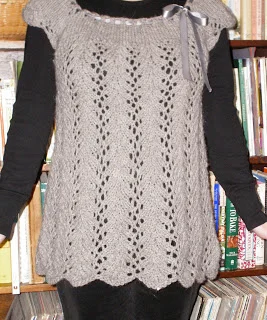
I actually made a garment for moi!  I felt a little guilty knitting for myself this close to the holidays, but it was my birthday after all, and I was sick, so a little self-indulgence wasn't totally out of line.

This pattern is from

French Girl Knits

, by Kristeen Griffin-Grimes.  I have to say that I love this sweater.  It is one of those rare garments that you forget you are wearing.  It is warm and pretty, a little girly, but not so fancy that I'm afraid to wear it—I actually think I may be making another of these , I love it that much.  I tweaked the pattern a little here and there.  After casting on and getting about 3 inches up, I decided that I didn't like the way the scallops at the bottom were laying {they curled up too much for my liking}, so I ripped and started my sweater by joining in the round immediately after the cast on and working one round of purl before going onto the lace.  I did the same thing on the sleeves.  I also altered the decreases (the way I worked them, not the number) both on the lace pattern and the yoke, but that was just a "knit-picky" knitting preference on my part.  I made this sweater in a size small, out of one skein of

Cascade Ecological Wool

.  I did two repeats fewer than the pattern called for, but would have had enough to finish the piece with one skein even if I had made it the full length.  One skein!...how cool is that!...I made this sweater for less than twenty dollars!...Practical and pretty...my favorite combo!  Oh, and did I mention that it was a pretty fast knit...less than a week's worth of knitting!...true love for sure!

And now on to the wedding cake {tropical themed} I have to deliver tomorrow...eeks!...I'm woefully behind on this one, so I will be in the kitchen all day and into the night.  Don't cry for me though, it's warm in my cozy kitchen and it's just starting to snow outside...I can't think of a place I'd rather be, unless it was knitting in front of the fireplace.

Wishing you the coziest of weekends!

xoxo—alison

The stockings were hung...

Here it is!... one finished mini-stocking advent garland!...ta-dah!...


We have been enjoying it all week and are loving the festive little ritual of opening each new stocking at breakfast.  Okay, maybe I was up until 5am getting it ready for the morning of December 1st, but now that I have had time to catch up a bit, I can honestly say it was worth it.  So far I've only moved it three times, trying to find the perfect place for it, you know—luckily the family just rolls with it and does a quick look-see to find where it traveled to in the night.


This pic cracks me up...looks a little like what I imagine the hearth of the little old woman {you know, the one who lived in a shoe} might look like on laundry day...


Okay, as promised...Here are the instructions for my version of the mini-stocking garland.  There are so many fun ways to tackle this project.  If you are on Ravelry, hop on over here to see how other people approached the same idea—so many cute minis out there.  Obviously, I'm a little late getting the instructions posted for you to make your own advent garland for this year (although you could just do a new stocking a day from now until Christmas—they whip up really fast), but there's always the 12 days of Christmas.  In the past I have used my mini-stockings as holiday wrap for little gifts and gift cards, for decorating holiday packages and wreaths, and just for decorating the house or the tree.  My youngest really loves these little stockings and can always put them to use—lots of uses for these little cuties.

The Details 

I made my mini stockings with Cascade 220, because I have a lot of it and because I wanted it to go fast.  As you can see from the color explosion here, I used this project for some serious stash busting.  It's perfect for that, but if you want to make them out of the same color, I think that you could get the entire project, including the I-cord garland out of a skein or two.  If you have lots of DK weight wool hanging around, it would work just as well.  Just keep in mind that you will need to adjust your needle size and be aware that your minis will be a little smaller.


The Stockings

Finished Size
Leg = 2 1/2" from upper edge to beginning of heel flap.
Foot =  4 1/2" from back of heel to tip of toe.

Materials
For the Stockings—
28 to 29 yds (13 to 15 g) worsted weight wool
US 6 double point needles
US 7 double point needles 
US size G (4mm) crochet hook 
Tapestry needle

Gauge
5 stitches to the inch, in Stockinette stitch, using US size 6 double point needles.

Leg
Using US 7 dpns and contrasting yarn (if desired), cast on 24 sts.  Divide the sts evenly onto three dpns.  Join work in the round.
Round 1:  *Purl 3 sts, make a bobble in the next stitch.  To make a bobble k1, p1, k1, p1 in the next stitch (4 sts made from 1).  Turn the work, k4, turn work, p4.  Do not turn work after working these last four sts, instead pass the 2nd, 3rd, and 4th stitch over the last stitch worked and off of the needle.  Repeat from * around, until you are back at the beginning of the round.
Rounds 2-4:  Purl.  Cut contrasting yarn, leaving a long tail.
Remaining Leg Rounds:  Switch to US 6 dpns, join main color, and knit until the leg measures 2 1/2" from the cast on.  Cut main color.

Heel Flap 
The heel flap is worked back and forth in rows as follows.  Join contrast color and knit across 6 sts. Turn work and purl across 12 sts.  These 12 sts make up the heel flap. Place the remaining 12 sts on a dpn or holder (these are the instep sts and will be worked later). Ignore the instep stitches while you work the remainder of the heel flap.  Work back and forth on the heel flap sts as follows—
Row 1:  Slip 1 st, knit across the remaining 11 sts.
Row 2:  Slip 1 st, purl the remaining 11 sts.
Repeat Rows 1 and 2 until 10 rows have been worked and there are 5 long chain stitches along the each side of the heel flap, ending with a purl row.

Turn Heel
Slip 1, k6, ssk, k1, turn.  
Slip 1, p3, p2tog, p1, turn.
Slip 1, k4, ssk, k1, turn.
Slip 1, p5, p2tog, p1, turn.
You will end with 8 sts.  Slip 1, k3, cut yarn, ending in the middle of the heel flap.  

Heel Gusset
The remainder of the stocking will be worked in the round.
With the right side of the heel flap facing you and using a separate dpn and main color, knit across the 4 remaining heel sts. Do not turn work.  Instead, pick up and knit 1 st into each long chain stitch along the heel selvedge. You should now have 10 sts on this needle (if you have one more or less, don't stress, just make sure that you pick up the same number on the opposite selvedge so that the gussets match in the end).  This needle, will be referred to as Needle 1 from here on out.

Using a separate US 6 dpn, knit across the 12 sts for the instep.  This needle will be referred to as Needle 2.
Using another US 6 dpn, pick up and knit 1 stitch for each heel selvedge stitch as you did at the beginning of the round.  Once you have picked up 6 sts, knit across the 4 remaining heel flap sts.  You should now have 10 sts on this needle, Needle 3.

Round 1:  Knit one round—32 sts total—10 sts on Needle 1, 12 sts on Needle 2 (the instep) and 10 sts on Needle 3.
Round 2 (decrease round):  Knit to the last 3 sts on Needle 1, k2tog, k1.  Knit across the instep sts (Needle 2).  K1, ssk, k the remaining sts on Needle 3.
Repeat Rounds 1 and 2, until the original number of sts is restored—24 sts total.  You should have 6 sts on Needles 1 and 3 and 12 sts on Needle 2.

Knit plain until the foot is approximately 2", from where you joined the main color at the end of the heel.   Cut yarn.
 

Toe 
Round 1:  Join contrast color and k one round.
Round 2 (decrease round):  Knit to the last three sts of Needle 1, k2tog, k1.  Knit the first st on Needle 2, ssk, k to the last 3 sts on Needle 2, k2tog, k1.  Knit the first st on Needle 3, ssk, k to the end of Needle 3.—4 sts are decreased in this round.

Continue repeating Rounds 1 and 2 until 8 sts remain.  Cut yarn, leaving a 8-10" tail.  Thread the tail onto a tapestry needle and run the needle through the live sts on the needles, removing the needles as you do so.  Pull the thread taut to draw up the toe sts, turn sock inside out, fasten off tail, and weave in the end.  

Finishing
To make a hanging tag for your stocking, use the crochet hook to make a 12 to 20 stitch chain.  Sew it to the top of the stocking.  Weave in all remaining ends.  Voila!...one cute and very quick little stocking! 


The Garland

 
I suspended my stockings on an I-cord garland.  You could use a ribbon for this—we live about an hour away from everything and I didn't have the right ribbon, so I-cord it was. I used the US 6 dpns and made a 5 stitch I-cord.  I spaced the stockings 4" inches apart in groups of 6, and allowed for a loop in between every section of 6 stockings, thus I ended up knitting around 5 yards of I-cord—that's about one movie.  

Because I wanted my stockings to be removable, I decided to suspend them on buttons sewn directly onto the I-cord.  I used 7/8" buttons (could use any size tho).  I had it in my head that this would be an entirely handmade project, so I decided to make covered buttons.  Obviously, you could use premade buttons and the project would be just as cute, but if you've never covered buttons of your own, I highly recommend it (I could do a whole week of posts on covered buttons—I love them that much).  I embroidered the numbers on mine, but I also considered stamping or painting them (even a sharpie or paint pen would work here—lots of possibilities).  In the end, I had embroidery floss on hand, so that's what I did.  One square of muslin, a pencil, an embroidery hoop, and a needle and floss and there you go...


After the buttons were made, I divided the I-cord into 4 sections, making a loop in between each section and one at each end, so that there were 5 loops in all.  Then I spaced the buttons evenly along the 4 sections and sewed them to the I-cord.  Done and ready for fun! 


In other news...
I am loving Giveaway Day 2009!  Go check out the fun offerings, the gorgeous blogs and meet all the talented people participating this year.  All of the give-aways are open until December 6th.  Trust me, you won't be disappointed, and even if you do spend your whole day surfing from one inspiring blog to the next and commenting all the way, that's what left-overs and take-out are for, right? 

I have a copy of my book up for grabs...


If you haven't signed up for the give-away yet, check out this post to put your name in the hat!  I am having soooo much fun with this!  I love reading all of the comments and hearing who and what your favorite fairy tales are...love, love, loving it!  Thank you!...oh and those fingerless gloves...I will be sharing the pattern for those in an upcoming post—next week.

Happy knitting and Happy Friday!...
xoxo—alison

The Merry Month of October...

Home again!  I'm just back from a quick visit to see my mom.  She just had surgery and needed a little cheering up, and I needed to sit with her and see with my own eyes just how she was really doing—much better—thanks for asking.  My time with my mom this week was full of sweet moments.  A while back Annri blogged this lovely post about mothers and mothering and it has really stayed with me—she said it all so well—I love that about her.

What does a girl need for a short stay away from home?...

Well, I'll tell you...she needs at least a half dozen knitting books, a basket of wool for working on the mini-stocking knit along, her mystery socks, several odd skeins and stitch guides for random swatching, an apple coffee cake, a batch of cherry scones, an assortment of teas to help settle Mom's queasy tummy, at least two books for reading, because you don't know what you'll be in the mood for, a camera which she will promptly forget about until after she's left her mom, her ipod loaded with various podcasts, her favorite slippers and...oh yeah, a change of clothes...This is why it is dangerous for me to travel by car.

{sorry for the blurry pics in this post —my camera is being persnickety these days}

Now that I'm home, it's starting to look a lot like...


Have I told you how much I love this holiday?...the dressing up, the crafting, the pumpkins, the weather, the colors, and the candy!!!


 In the interest of full disclosure (you're only as sick as your secrets, right?) I will own up to the fact that this is about the time of year when I stop eating meals and just forage for candy.

I didn't even buy treats that I like this year and still today's lunch was a handful of candy corn and a cup of coffee...and I don't even like candy corn, but, after all, it is candy and it's here...pathetic, I know.

Even more than the candy though, I love the creative opportunities surrounding this holiday—so many fun crafts, so little time.  We made this little door pocket a while ago.  There have been many like this through the years.


It is a perfect first sewing project—perfectly imperfect!  Terrific for new sewing hands.  You will need some wool felt scraps, some buttons and yarn scraps to make this quick project.

Here's how...All we did was draw the outline of the shape we wanted onto a piece of paper, pinned the paper pattern to two layers of felt and cut around the edges.  Then we raided the button jar and the scrap pile for eyes a nose and a mouth.  Time to pin the facial features to one of the layers of felt and sew them on with a whip stitch or running stitch.  There is really no way to mess this up.  The results are always cute and a little funny.  Finally we layered the pieces of felt together and sewed around the edges using a blanket stitch.  Leave the top of the head open for candy, notes or whatever, and tack a ribbon or spare piece of felt to the inside back of the pocket for a handle and voila!  Easy-peasy, and once it is filled with candy, this cranky kitty is absolutely delectable!


This just in...

If you're still trying to figure out how your little darling is going to carry all of her Halloween loot, or if you're feeling the need for a festive and seasonal knitting bag/purse, you might want to check out the Going Batty Treat Bag pattern — free for all who want it! 

Glad to be back...I missed you!...Alison


Going Batty...

:

Another beautiful fall day here in the middle of the middle!...I think that an after school trip to the pumpkin patch may be in order.  I have been feeling so cozy lately, wanting to bake and knit and play house—I have to keep reminding myself that there is a lotta' cozy coming up.  But these colorful fall days are numbered, and now is the time to get out there and enjoy it.

Here's what's been on the needles this week.  In addition to the mini stockings (ahem...we're on day 21—and am frightfully behind) and the mystery sock (fun, fun, fun!), I have been working on a new treat bag for the little lad.  This project super easy and it worked up in a twinkling.  Admittedly, I did do some ripping after the lad and I consulted and he informed me that the design might be nicer if the bat didn't  have eyes (he was  right, btw), and I did have to rearrange some of the yarn overs in my original design so that the batty pattern would be easily recognizable in this thick yarn, but other than that it just flew off the needles.  Now I know that Halloween is just 10 days away (we're counting them over here), but this really does zip up and if you have the inclination and a little bulky wool in your stash, you could have this done in a flash.

Okay the name of this bag—Going Batty—isn't just about the pattern motif.  I am having a bad computer day—problems importing this pattern here, but I wanted to post it here today—it's important to have a goal. 

I have saved it as a document and as a pdf and I will consult with my crack computer team later tonight to see how best to get it posted here without having to retype the whole thing.  In the meantime, just

email

me if you would like me to send you the pattern.

  {Got this fixed—here's the

link

to the pattern}

Okay, officially signing off for now...pumpkin patch here I come!...xoxo—alison

Show and tell...

Oh my!  Things really are getting away from me!...

I just realized that I never posted about the trunk show and Fairy Tale Knits book signing that the lovely ladies at Yarns Unlimited in Bloomington, Indiana are hosting this Saturday, October 10th from 1-3 pm.

I am so honored to be participating in this event, doubly so since it is the 30th anniversary of the shop.  Yes, you read right...Yarns has been helping spinners, weavers, dyers and knitters for thirty years.  Needless to say, this shop is a very special place, full of inspirational staff, positive energy and support for fiber enthusiasts from all walks of life and all levels of expertise.  When I moved to this area 13 years ago it meant leaving a town that I loved and a community of talented and supportive friends.  Yarns Unlimited made that transition a little easier for me (as they have for so many others)...by welcoming me with open arms and providing a warm and instructive environment.  Honestly, I can't say enough about this wonderful place.

So please, if you are in the area, come by and celebrate with us!...there will be food, fun, and, of course, lots of yarn.  I will be signing books and will have all of the samples from Fairy Tale Knits with me.  If you are unfamiliar with the book, you can read a review here.  I will also bring the Ladybug Coat (Fall Issue of Petite Purls) for show and tellI'd love to meet you if you can make it!...I'll be the one behind a big pile of little kid knits!...xoxo—Alison

Ladybug show and tell...


I am so happy today to be able to share a little secret that I've been keeping!  Back in July I submitted a design to the fabulous new online zine Petite Purls and it was accepted!...I was surprised and thrilled and am still absolutely over the moon about this!  I love this zine—love the look of it, the idea of it, the whole thing.  The first issue was so beautiful and I feel so honored to have a design in their fall issue.  It's strange even after writing a book full of designs and having other published patterns under my belt, I still can't believe it when I get a new design opportunity.  It feels utterly unbelievable and beyond wonderful that I get to spend my days doing something that I love so much!  Plus, Allegra one of the editors of Petite Purls reviewed my book!  How cool is that!...Thank you to Brandy, Allegra and Joan of Petite Purls for this wonderful opportunity!  It was a complete joy! 

The Ladybug pattern accompanied us on our family vacation, and I worked on it in every state between my front door and New England...I kind of love that!  It was finished after our return home, amidst all of this.  The pattern was a fun and easy knit and the yarn, Baby Twist by Alpaca with a Twist, is a dream come true.  It is soft and lovely to knit with and the fabric is truly scrumptious, light, soft and drapey but with substance, not at all flimsy, if you know what I mean.  I'll definitely be knitting with more of this stuff. 

Then it was time for a quick photo shoot.  Some of you might recognize my adorable model from a couple of the patterns in Fairy Tale Knits.  Let me tell you, this little girl is a trooper.  This shoot had to be postponed because of...well...life...illnesses, vacation schedules and squeeze in an out of town funeral and you get the picture.  We literally had one open window for this shoot and it just happened to be the hottest, muggiest day of the year—really.  You know the kind—I walked outside and my glasses immediately fogged over (and we keep our air conditioner set in the high 70s).  It felt like walking into a steam bath.  But I want to tell you that this little girl was a champ.  She put on that Alpaca coat and worked it.  This really reinforced my belief that natural fibers breathe—she never once asked to take this jacket off.

I thought you might like to see some scenes from the shoot...
New shoes!...always a good way to start!...


Almost ready...


So cute...


Let's try over here...


Look a leaf!...that looks fallish!...


Enough modeling!...see ya!...

As you can see from these shots, I had a lot of help.  Thank you to little Eleanor, her wonderful parents, to my sweet daughter and dear spouse for getting up early and out on this steamy day!  It was fun!

free patterns!

I just found out that Amazon has provided free copies of two patterns from my new book! Let's hear it for free stuff!

The first pattern is the Snow Queen Sweater Coat. This is one of those designs that just rolled and rolled around in my head and would not leave me alone until I finally picked up my knitting needles and got to it. I love the charm of vintage knits, as you might be able to tell from this pattern. I had a lot of fun thinking about and designing this sweater and even more fun knitting it...so much fun that I have knit this one up in different sizes for various family friends. It's has turned out to be a real fav. It's girly without being fussy and is wearable for more years than your average sweater because of the long skirt and the ruffly cuffs.


The other pattern is the Princess Crown. There are two versions of this pattern. One is a hat with lacey details at the top and the other is a basic crown. While this pattern is called the "Princess Crown" the crown version of this pattern is absolutely suitable for both girls and boys. You can whip these little crowns in no time at all, and if your kids are like mine, you can never have too many crowns.


I had so much fun designing and knitting these patterns, I hope that you do too! If you do knit either of these up I'd love to see pics!

Have a great weekend :)